3.3.1. Communication via OpenID Connect
The process of logging in using MojeID has various variants (based on different schemas) that consist of several steps. As you implement MojeID, you can choose the schema(s) you prefer.
The first steps are the same for all the schemas:
Client’s registration – You have to register your client on MojeID servers before you can use the OpenID Connect protocol.
Requesting login using MojeID – The user clicks the Log in via MojeID button.
Requesting identity authentication – The service provider creates an identity authentication request and sends it (indirectly by redirecting the user’s browser) to the OpenID Connect provider’s endpoint (
Authorization Endpoint) where the user authenticates.Performing authentication – The user logs in at the MojeID login page using one of the login methods to verify their identity. At this moment, we support login with password, digital certificate, one-time password, or security key (FIDO 2).
The next steps depend on the chosen schema.
3.3.1.1. Implicit schema

Response with the identity authentication outcome – After the login and confirmation, the user is redirected back to the service provider’s website and via their browser sends the response from MojeID servers with the user identificator and ID token. If the service provider requests it during the identity authentication process, the ID token will include data about the user.
3.3.1.2. Access code
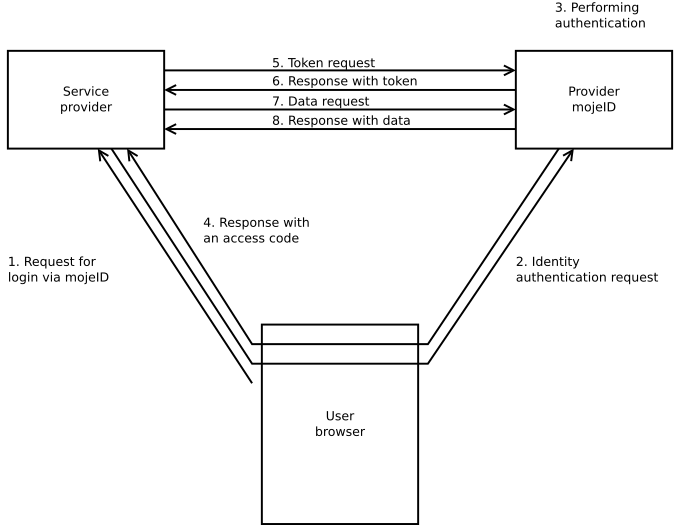
Response with an access code – After the login and confirmation, the user is redirected back to the service provider’s website and via their browser sends the response from MojeID servers with an access code.
Token request – The service provider creates a token request using the access code they just received and sends it to the
Token Endpoint.Response with a token – The service provider receives a response with access token and token ID.
Data request – The service provider creates a user data request using the access token they received and sends it to
UserInfo Endpoint.Response with data – The service provider receives a response with user’s data.
3.3.1.3. Hybrid schema
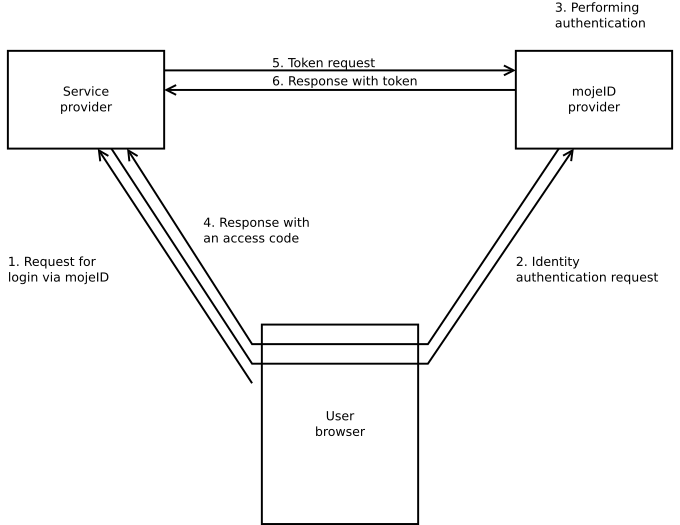
Response with an access code – After the login and confirmation, the user is redirected back to the service provider’s website and via their browser sends the response from MojeID servers with an access code.
Token request – The service provider creates a token request using the access code they just received and sends it to the
Token Endpoint.Response with a token – The service provider receives a response with an access token and a token ID that contains the user’s data.
3.3.1.4. Schema selection
For web services that run only in browser (“without server”, e.g. JavaScript), it is best to use Implicit Schema.
For server services, it is better to use the Access Code schema which is more secure.
The following table provides an overview of the basic characteristics of the individual schemas and it helps with the selection of an appropriate login schema.
Characteristic |
Implicit Schema |
Access Code |
Hybrid Schema |
|---|---|---|---|
All the tokens are returned from the Authorization Endpoint |
yes |
no |
no |
All the tokens are returned from the Token Endpoint |
no |
yes |
no |
Tokens are not visible in User Agent |
no |
yes |
no |
The client can use authentication |
no |
yes |
yes |
It is possible to get a Refresh token |
no |
yes |
yes |
Communication within a single request |
yes |
no |
no |
Most of the communication is server-to-server |
no |
yes |
various |