Technical documentation for implementation of MojeID
Edition: 3.1
Legal Notice
Limitation of Liability
Except in cases of damage caused intentionally or due to serious negligence, or damage to person’s basic rights, or to maximal extent allowed by the user’s legislation system, the CZ.NIC Association holds no responsibility for any direct or indirect damages resulting from usage (including installation) of MojeID, including but not limited to damage to reputation, damage resulting from interrupted work, loss or damage of data, or any other economical damage (e.g. loss of profits, not reaching expected savings, etc.).
Please keep in mind that the information provided in this documentation does not serve as a warranty, explicit nor implicit, especially as a warranty of suitability for a specific purpose or warranty of usability in other legal system than the legal system of the Czech Republic.
Privacy Protection
MojeID was developed in the Czech Republic and its privacy protection policy is in accordance with the national legislation of the Czech Republic, including opinions of Personal Data Protection Authority. Before using MojeID outside of the Czech Republic make sure that the MojeID data protection policiy is in accordance with the legal requirements of the given country.
Applicable Legislation and Competent Jurisdiction
The MojeID implementation documentation (and associated documents) are governed and interpreted in all regards in accordance with Czech legislation. All disputes or claims resulting from or associated to using MojeID (or this documentation), including its interpretation, implementation, invalidity, etc. will be definitively settled by Court of Arbitration at the Economic Chamber of the Czech Republic and Agricultural Chamber of the Czech Republic (hereinafter as “court”) pursuant to its Rules of Procedure by one arbitrator elected by this court’s chairman.
Conditions for Using MojeID Logo
The CZ.NIC Association is the executor of property copyright rights to figurative mark - MojeID logo and its derived modalities. The CZ.NIC Association hereby allows the usage of the MojeID logo and its associated modalities with regard to implementation, usage and/or promotion of MojeID or promotion of the CZ.NIC Association and its products in any common way logos are used. The right to use MojeID logo and its associated modalities is free of charge, non-exclusive, unlimited in quantity and geography, and limited in time in regard to the usage of MojeID. The user is not required to exercise the right to use the MojeID logo and its associated modalities. The right to use the MojeID logo and its associated modalities cannot be forwarded to a third person without consent from the CZ.NIC Association. The MojeID logo and its associated modalities cannot be abused to damage good reputation of the CZ.NIC Association or used contrary to the interests of the CZ.NIC Association. The MojeID logo and its associated modalities cannot be belittled or used in derogatory manners. The MojeID logo has to be figured as per instructions of the Graphical Manual and used exclusively in such fashion.
1. Introduction
This document includes a general introduction to the MojeID service. You can also find here examples and other general information that will help you design the implementation of MojeID support in your web application. It will help you get a basic overview of the steps that will have to be taken to implement MojeID support and you will be able to estimate the complexity of the implementation.
MojeID currently offers two authentication protocols that can be used. They are OpenID Connect (recommended) and SAML 2.0.
Tip
If you do not use any of these protocols in your system, we recommend choosing OpenID Connect.
It is the newest of the offered protocols and it has some improvements based on the experience from using the other two. Its main advantages are simpler implementation and mobile platforms support.
However, if you already use the SAML 2.0 protocol in your system, it is logical to use that protocol for integration with MojeID too.
2. Terminology
The following terminology is used in the next chapters regarding the implementation of MojeID:
- Service provider
provider of a web application (or simply an application, because it manages everything automatically without any manual setting) that requires verification of user’s identity via MojeID
- Full access
MojeID implementation variant at the service provider, more details at https://www.mojeid.cz/en/provider/options-and-prices/
- Limited access
MojeID implementation variant at the service provider, more details at https://www.mojeid.cz/en/provider/options-and-prices/
- Identity
set of data about the user that are linked to an identifier and managed by an OpenID provider
- Identifier
a URL with an
httporhttps`schema that defines and provides certain data in the :term:`identity <Identity>, e.g.http://specs.nic.cz/attr/contact/valid.- Realm
the service provider’s URL area defining a part of a URL region for which the identity authentication request is valid
- OP
- OpenID provider
OpenID2 identities provider and maintainer on whose web the authentication is carried out. In case of MojeID, it is the CZ.NIC Association.
- OCP
- OpenID Connect provider
OpenID Connect identities provider and maintainer on whose web the authentication is carried out. In case of MojeID, it is the CZ.NIC Association.
- Identity name
the name of MojeID identity in form of
jmenoidentity.mojeid.cz, that the user enters in the login form as the identity they want to log in with, e.g.demo.mojeid.cz.- Claimed identifier
identifier derived from identity name under which the identity is available at OpenID provider and from where it is possible to retrieve matadata of this identifier, e.g.
https://demo.mojeid.cz/#UnIqUe.- OP endpoint
URL where the OpenID2 provider receives messages. In case of MojeID, it is
https://mojeid.cz/endpoint/.- Registration Endpoint
URL where it is possible to register a new service provider according to OpenID Connect Dynamic Client Registration specification.
- Client ID
unique identifier of a service that uses OpenID Connect. It is assigned on registration and used during all the communication via OpenID Connect.
- Client Secret
password that certifies the service provider’s authenticity in regard to his Client ID. This password can be changed using Registration Access Token.
- Registration Access Token
token used for authorization of any change of data about the service, e.g. Client Secret
- Authorization Endpoint
a URL to which service providers redirect users for login
- ID Token
contains a confirmation of a successful identity authentication of a user whose data is contained within the ID Token
- Access Token
a token used to authenticate a UserInfo Endpoint request
- UserInfo Endpoint
a URL where it is possibe to get detailed data of a user if they are not contained in the ID Token
- Token Endpoint
a URL where it is possible to get the Access Token, or the Refresh Token, in case they have not been received directly in the response to authentication.
- Refresh Token
a token that can be used to receive data from the UserInfo Endpoint even without the user’s presence.
3. Getting started with MojeID
This chapter is an introduction to basic principles of the MojeID service, the forms of MojeID identities and the communication process via supported protocols.
3.1. Basics of MojeID
MojeID is a service that allows its users to create and centrally manage their internet identity (a set of personal data, e.g. first name, surname, e-mail address, phone number, etc. together with login methods). Users can then use this identity to log into various external web applications (applications of different service providers than the identity provider) and they do not have to create individual accounts and repeatedly fill in their basic information and use different usernames and passwords.
The mojeiD service is a specific implementation of the OpenID 2.0 and OpenID Connect 1.0 standard for decentralized management of internet identities which define the ways to verify these centrally managed identities and the forms of their identifiers.
MojeID account can be paired with National Point for Identification and Authentication (NIA) to verify user’s identity and gain access to public administration services. For more information, see chapter Pairing MojeID with NIA.
MojeID is specific for the Czech internet environment and offers the service providers additional advantages over the standard OpenID, e.g. extended set of personal data in the identities and their transfering, or more login methods with the possibility to require certain level of authentication.
3.2. MojeID Identity
When creating an identity, users have to choose a name of their identity which uniquely determines each MojeID identity
and which is always in the form of identityname.mojeid.cz (alphanumeric characters), e.g. demo.mojeid.cz.
The users then use this name to log into pages of service providers.
MojeID Identity consists of:
Information the user includes in their identity (common personal data, such as name, address, phone number, nickname, etc.)
Information about the user provided by the MojeID service provider, especially information about the physical identity verification (user’s personal data verification, or the information about whether the person is older than 18).
Tip
Specific lists of information that can be transferred from the MojeID identity using the individual protocols can be found in udaje-openid, Appendix 1 – List of Data to be Handed Over (OpenID Connect) and Appendix 3 – List of Data to be Handed Over (SAML).
3.3. Communication with MojeID
This section generally describes communication processes that take place when a moje ID user logs in to a service that supports a certain protocol.
3.3.1. Communication via OpenID Connect
The process of logging in using MojeID has various variants (based on different schemas) that consist of several steps. As you implement MojeID, you can choose the schema(s) you prefer.
The first steps are the same for all the schemas:
Client’s registration – You have to register your client on MojeID servers before you can use the OpenID Connect protocol.
Requesting login using MojeID – The user clicks the Log in via MojeID button.
Requesting identity authentication – The service provider creates an identity authentication request and sends it (indirectly by redirecting the user’s browser) to the OpenID Connect provider’s endpoint (
Authorization Endpoint) where the user authenticates.Performing authentication – The user logs in at the MojeID login page using one of the login methods to verify their identity. At this moment, we support login with password, digital certificate, one-time password, or security key (FIDO 2).
The next steps depend on the chosen schema.
3.3.1.1. Implicit schema
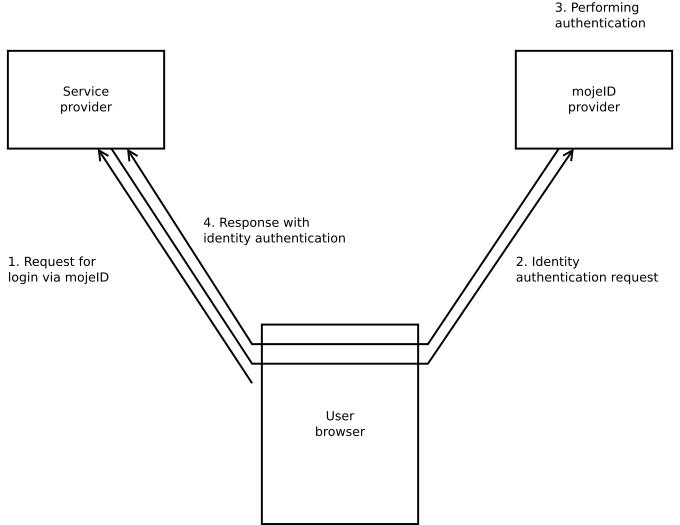
Response with the identity authentication outcome – After the login and confirmation, the user is redirected back to the service provider’s website and via their browser sends the response from MojeID servers with the user identificator and ID token. If the service provider requests it during the identity authentication process, the ID token will include data about the user.
3.3.1.2. Access code
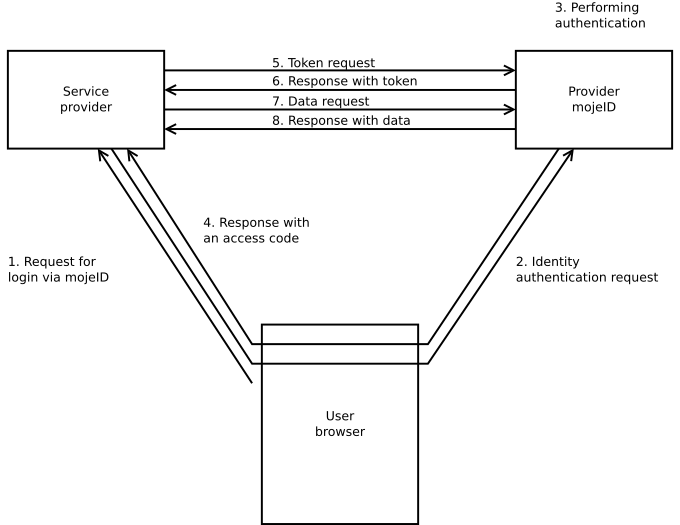
Response with an access code – After the login and confirmation, the user is redirected back to the service provider’s website and via their browser sends the response from MojeID servers with an access code.
Token request – The service provider creates a token request using the access code they just received and sends it to the
Token Endpoint.Response with a token – The service provider receives a response with access token and token ID.
Data request – The service provider creates a user data request using the access token they received and sends it to
UserInfo Endpoint.Response with data – The service provider receives a response with user’s data.
3.3.1.3. Hybrid schema

Response with an access code – After the login and confirmation, the user is redirected back to the service provider’s website and via their browser sends the response from MojeID servers with an access code.
Token request – The service provider creates a token request using the access code they just received and sends it to the
Token Endpoint.Response with a token – The service provider receives a response with an access token and a token ID that contains the user’s data.
3.3.1.4. Schema selection
For web services that run only in browser (“without server”, e.g. JavaScript), it is best to use Implicit Schema.
For server services, it is better to use the Access Code schema which is more secure.
The following table provides an overview of the basic characteristics of the individual schemas and it helps with the selection of an appropriate login schema.
Characteristic |
Implicit Schema |
Access Code |
Hybrid Schema |
|---|---|---|---|
All the tokens are returned from the Authorization Endpoint |
yes |
no |
no |
All the tokens are returned from the Token Endpoint |
no |
yes |
no |
Tokens are not visible in User Agent |
no |
yes |
no |
The client can use authentication |
no |
yes |
yes |
It is possible to get a Refresh token |
no |
yes |
yes |
Communication within a single request |
yes |
no |
no |
Most of the communication is server-to-server |
no |
yes |
various |
3.4. Favicon
A favicon is a graphical element (icon) associated with a certain website or, in case of MojeID, a service. Web browsers can display favicons as a visual symbol of a website’s identity in address bar, bookmarks or Favourites.
MojeID displays a favicon in the MojeID login form next to the name of the service the MojeID user is logging into.
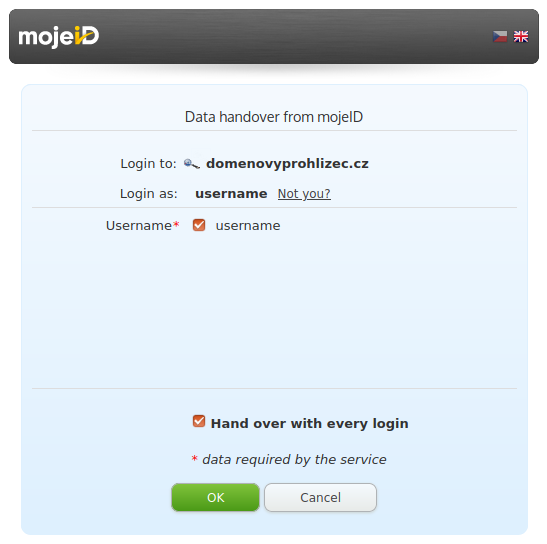
Favicon display example
The use of the favicon differs based on the protocol.
3.4.1. Settings in OpenID Connect
You need to upload the favicon file to your website and set its address as metadata (logo_uri)
within your client’s registration (see Client Registration).
If the icon is found at the defined URI, it is displayed in the MojeID form, no matter the type of access (full/partial) služby k MojeID.
3.4.2. Settings for SAML
You need to explicitly upload the favicon file to our system.
The favicon is downloaded either automatically (once a week), or you can provide it directly to CZ.NIC (e.g. by e-mail to our support) and we will upload it manually. With automatic downloading, the algorithm searches for the favicon on the provider’s realm based on the W3C favicon standard, section Method 1.
Favicons cannot be larger than 10 kB. The supported formats are ICO and PNG.
Displaying a favicon for services communicating via this protocol is possible only when the service has full access.
3.5. Pairing MojeID with NIA
MojeID account can be paired with National Point for Identification and
Authentication (NIA). Pairing the account verifies the users‘ identity and
the user gains access to public administration services. Only a natural
person can be paired. If the Organization field is filled, pairing with
NIA is not possible.
Transferred data verified by NIA: First name, Surname, Home address,
Date of birth. Data verified this way cannot be changed in the profile,
they are updated automatically from citizen registry. If the user wants to
change the locked data, he has to cancel the NIA pairing, also removing the
ability to access public administration services. Subsequent data change will
also remove identity verification.
MojeID supports two levels of assurance according to eIDAS: “substantial” and “high”. Service provider can request login with such an authenticated account using SAML or OIDC protocols only.
More information on how to request such a login can be found in specific protocols:
4. MojeID Support Implementation
This chapter takes you through the details of the individual phases of the communication process that need to be taken into account during the implementation of the support of the protocol. It also describes the prerequisites that need to be met to successfully implement the support.
Important
Due to security reasons, MojeID does not permit displaying of the login page within frames
(<iframe>).
4.1. Implementation via OpenID Connect (OIDC)
This section will introduce you to the technical aspects of the implementation of MojeID into web applications via the OpenID Connect protocol.
We recommend to study this text in order to properly understand the principles and processes of MojeID / OpenID Connect. Most of the things described here can be solved by using available libraries for the implementation of OpenID Connect that we recommend to use.
The Implementation Process Overview section will take you through the implementation process step by step. Other sections describe the individual steps in more details.
The official specification of the OpenID Connect protocol can be found at https://openid.net/specs/openid-connect-core-1_0.html.
MojeID server publishes basic information about OIDC configuration at https://mojeid.cz/.well-known/openid-configuration/.
You can test your implementation using the MojeID Test Instance.
The list of data that can be transferred by the protocol (including their identifiers) is available in the Appendix 1 – List of Data to be Handed Over (OpenID Connect).
Examples and solutions of error messages can be found in the Appendix 6 – Examples and Solution of Error Messages.
Note
All the examples of source code listed below illustrate implementation in Python using the pyoidc library.
4.1.1. Overview of Libraries and Modules
The official OpenID Foundation website offers a list of certified OIDC protocol implementations in several programming languages (see Certified OpenID Connect Implementations). The relevant part for you is implementations for Relying Party that corresponds to the service you provide.
For the use in mobile apps, it is best to use libraries for native apps:
For Android e.g. http://openid.github.io/AppAuth-Android/,
For iOS e.g. http://openid.github.io/AppAuth-iOS/.
You can also use modules for the most popular platforms:
WordPress: OpenID Connect Generic Client (daggerheart)
Drupal: OpenID Connect module
Magento: OpenID Connect Single Sign-On (SSO) Magento Extension By Gluu
OpenCart: OpenCart OpenID Connect Single Sign-On (SSO) Extension By Gluu
Django: OIDC Django Packages
If you know another one that should be mentioned here, we will be glad to hear from you (techsupport@mojeid.cz).
4.1.1.1. MojeID login via PHP client
This manual contains the procedure for installing the plugin for logging into MojeID via PHP client and an example of how to use it.
4.1.1.1.1. Prerequisites
Before you can proceed, you need to do the following:
Install Composer
Install Docker Engine
Download the
php-mojeid-oidcplugin from our public GitLab
4.1.1.1.2. Installation
In the
php-mojeid-oidcplugin folder run the following commands:cd php composer install # create a config file for a specific service cp config.{template,local}.php # start a web server sudo docker compose -f ../docker/docker-compose.yml up
Do the manual MojeID client registration.
In the list of URIs fill out URI, that your internet browser uses to access PHP application (folder
phpfrom this example). If using the provided docker solution on your own computer you can fill outhttps://localhost:8443/.You can find the address the web server uses from the
OpenIDConnectClient::getRedirectURL()method.If it does not match what you need, set the correct address using the
OpenIDConnectClient::setRedirectURL()method.
In the
config.local.phpfile fill out the requested data:OPEN_ID_PROVIDER_URLis the base URL of the service to which you want to connect toOPEN_ID_CLIENT_IDis the Client ID from the page https://mojeid.regtest.nic.cz/consumer_admin/OPEN_ID_CLIENT_SECRETis the Client secret from the page with the details of the serviceon the page above go to the Update link on the corresponding line
4.1.1.1.3. Application
Go to the example web page (https://localhost:8443/).
After potential self-signed certificate confirmation you will be redirected to the MojeID login page.
During the first login, you will be asked to agree to a data handover.
Once agreed you will be redirected back to your application page, where first name of filled user will be displayed uvidíte křestní jméno zadaného uživatele (if you have given the appropriate consent).
Important
We continue to test these modules. We will be glad if you share your experience with them.
4.1.2. Implementation Process Overview
This overview includes organizational and technical steps you have to take to implement logging in to your service via MojeID using the OpenID Connect protocol. The individual steps are brief and say what to do, while the link targets provide more details on how to do that, or they contain additional information. The overview can serve as a checklist.
Preparing the test environment
Register your service (client) at the test Registration Endpoint – this way you will get test metadata of your service (Client ID, Client Secret) and an opportunity to set up certain parameters of the communication.
Note
In case of the Automatic Registration, the Client Secret’s validity ends after a certain time period. If you decide to opt for Automatic Registration, it is important to set up registration renewal.
Send the service’s test metadata (Client ID) to support (techsupport@mojeid.cz). The support sets up accesses.
Implementation and debugging
You will need: text editor, browser, access to hosting, OIDC specifications
You might find our recommendations for debug tools. useful for implementation debugging. During the debugging, you might come accross various error messages. Appendix 6 – Examples and Solution of Error Messages might help you with them.
Add MojeID button and links to the (template/sites of the) service the user will use to request login. Follow correct implementation procedure!
Get test OIDC provider configuration (webfinger).
Library configuration – enter test Client ID and Client Secret, or also test endpoints, if the library cannot retreive this information automatically from the OIDC provider’s configuration.
Create and send an authentication request to the Authorization Endpoint.
Note
The request should also include the information about the chosen authentication schema </SeznameniSMojeid/ProcesKomunikacePresMojeid/OpenIDConnect/index>. The following steps correspond to the Access Code schema.
Process the authentication response at the return address stated in the request which receives an access code (
code).Create and send a token request to the Token Endpoint. You will use the received access code in the request.
Process the response from which you get an Access Token (
access_token) and an ID Token (id_token, What does ID Token contain?), whose validity has to be verified by the implementation (see ID Token Validation).If the ID Token is valid, create and send a user data request to UserInfo Endpoint. Use the received access code in the request.
Process the response with the user’s data according to the needs of your service.
Implementation verification
If you want to operate the service with a full access, we have to perform user test of your implementation before your service transitions to production environment.
When you finish debugging your implementation, send a notification to the support team (techsupport@mojeid.cz) that your implementation is ready for user test and attach the address of your service’s test instance.
When we finish debugging the last details together, your implementation will be ready for the transition to the production environment.
Transition to the production environment
To get the full access, you first need to sign a contract.
Register your service (client) at the production Registration Endpointu – this way you will get production metadata of your service and set up certain parameters of the communication.
Send the service’s production metadata (Client ID) to the support team (techsupport@mojeid.cz), also in case of a partial access.
The support team will add the service into the catalog.Get a production OIDC provider configuration (webfinger).
Reconfigure the implementation with production metadata, or also endpoints.
That is all.
4.1.3. Client Registration
To communicate with MojeID via OpenID Connect, it is necessary to register a client (service) at the MojeID server. It is possible to use either manual, or automatic registration. Automatic registration is suitable for dynamacially created clients (JS, mobile devices) and manual registration is suitable for server clients.
4.1.3.1. Manual registration
The manual registration can be done at https://mojeid.cz/consumer_admin/. In case of a MojeID test instance, at https://mojeid.regtest.nic.cz/consumer_admin/. You can then edit and delete the managed clients at the same address. The clients created this way have the validity period set to indefinite. Specifications of individual items can be found in the OpenID Connect protocol document (https://openid.net/specs/openid-connect-registration-1_0.html#ClientMetadata).
An example of manual registration of a client in MojeID test instance:
In any account that you create in the MojeID test instance, go to https://mojeid.regtest.nic.cz/consumer_admin/ after login.
Go to the
New service setuplink. Fill in the required filedsClient's name,List of URIsand clickSave.A record with the client’s ID is created in the list of managed services.
To get
Client secret / Tajemství klientago to theUpdatelink in the newly created service.A page where you can edit the setup is displayed ‒
Client secretis in the last row of the displayed form.
4.1.3.2. Automatic Registration
More details can be found in the OpenID Connect protocol document (https://openid.net/specs/openid-connect-registration-1_0.html). All the necessary settings should be done by the used library. Registration created this way will expire after 24 hours but it can be renewed (see Registration Change).
Caution: automatic (dynamic) registration cannot be used for Full access.
An example of registering a client using the library:
from oic.oic.consumer import Consumer

client = Consumer(SessionDB(URL), OIC_CONFIG, client_config=OIC_CLIENT_CONFIG)
client.redirect_uris = URL + client.consumer_config['authz_page']
provider_info = client.provider_config(ISSUER)
client.register(provider_info["registration_endpoint"], response_types='code', client_name=MY_CLIENT_NAME)
An example of a registration query:
POST /oidc/registration HTTP/1.1
Content-Type: application/json
Accept: application/json
Host: mojeid.cz

{
 "application_type": "web",
 "redirect_uris":
     ["https://client.example.org/callback",
      "https://client.example.org/callback2"],
 "client_name": "My Example",
 "logo_uri": "https://client.example.org/logo.png",
 "token_endpoint_auth_method": "client_secret_post"
}
An example of the server’s response to a registration query:
HTTP/1.1 201 Created
Content-Type: application/json
Cache-Control: no-store
Pragma: no-cache

{
 "client_id": "s6BhdRkqt3",
 "client_secret": "ZJYCqe3GGRvdrudKyZS0XhGv_Z45DuKhCUk0gBR1vZk",
 "client_secret_expires_at": 1577858400,
 "registration_access_token": "MY.SECRET.REGISTRATION.ACCESS.TOKEN",
 "registration_client_uri": "https://mojeid.cz/oidc/registration?client_id=s6BhdRkqt3",
 "token_endpoint_auth_method": "client_secret_post",
 "application_type": "web",
 "redirect_uris":
     ["https://client.example.org/callback",
      "https://client.example.org/callback2"],
 "client_name": "My Example",
 "logo_uri": "https://client.example.org/logo.png"
}
Note
- Registration can be processed and Client ID and Client Secret can be retrieved also without the library;
you only need to send a POST query via curl.
Example:
curl --data '{"redirect_uris": "https://navratova-adresa.cz",
  "client_name": "Název služby"}' https://mojeid.cz/oidc/registration/
Registration also allows to associate metadata with client registration (see Client Metadata in specification),
so the provider can define for example: service name and icon, specifically the attributes
client_name, logo_uri, or client_uri.
4.1.3.2.1. Information about Registration
A part of the MojeID server’s response to a completed registration is a URL where it is possible to get current
information about registration (configuration endpoint registration_client_uri),
and an access code (registration_access_token).
When sending a GET query to this URL, it is necessary to authenticate using an access code.
It needs to be included in the header of the Authorization HTTP request.
The server’s response has the same format as the response to registration and contains current information about your client on our server.
4.1.3.2.2. Registration Change
You can edit certain information about the registered client using the abovementioned configuration endpoint.
Configuration has to be done using a POST query with registration_access_token
added into the Authorization header.
The request format is the same as with the one for registration and its processing on server is also the same,
with the following exceptions:
It is not possible to change the registered
redirect_uriandclient_id.The
client_secretvalue is ignored. In case the item is included in the request, a newclient_secretis generated. It is sent in the response to the configuration query.
An example of a configuration query that will ensure generation of a new
client_secret and a change of logo_uri and policy_uri.
POST /oidc/registration?client_id=MYCLIENTID HTTP/1.1
Accept: application/json
Host: mojeid.cz
Authorization: Bearer MY.SECRET.REGISTRATION.ACCESS.TOKEN

{
 "client_secret": null,
 "logo_uri": "https://client.example.org/another-logo.png",
 "policy_uri": "https://client.example.org/policy-page"
}
The server’s response to the configuration query is the same as the response to the registration query and contains current information about your client on our server.
4.1.4. Requesting Login via MojeID
The process of identity authentication starts by the user submitting a login request via MojeID at your website. To ensure maximal user friendliness, you can just use a “Login with MojeID” button, see file MojeID graphic elements on the Getting started page. The username is entered later at the MojeID server.
Logging in to MojeID using a button is the only recommended and correct method.
4.1.5. Initiation
To be able to send an identity authentication request, your library needs to know either the user’s identifier, or the OCP endpoint.
Your application will use the identifier and endpoint to send a WebFinger query to retreive details about the OpenID Connect provider. The response to this query includes (among other things):
Autorization Endpoint – this is always
https://mojeid.cz/oidc/authorization/and this address is used for identity authentication requests.Token Endpoint – this is always
https://mojeid.cz/oidc/token/and this address is used for token requests.UserInfo Endpoint – this is always
https://mojeid.cz/oidc/userinfo/and this address is used for user data requests.
An example of query for a specific user:
GET /oidc/.well-known/webfinger?resource=acct%3Ajoe%40mojeid.cz&rel=http%3A%2F%2Fopenid.net%2Fspecs%2Fconnect%2F1.0%2Fissuer HTTP/1.1
Host: mojeid.cz
An example of the server’s response:
HTTP/1.1 200 OK
Content-Type: application/jrd+json

{
 "subject": "acct:joe@mojeid.cz",
 "links": [
    {"rel": "http://openid.net/specs/connect/1.0/issuer",
     "href": "https://mojeid.cz/oidc/"}
 ]
}
4.1.6. Requesting Identity Authentication
Once you know the OCP endpoint, your application sends an identity authentication request using the user’s browser redirection. The request includes special parameters for its realization. Correct use of these parameters is done by the OpenID Connect library used for implementation.
Identity authentication request usually includes the following parameters:
Return address (URL) of the application – The address to which the user returns after logging in from the OpenID Connect provider’s website and where the outcome of the login is processed.
Required groups of data from MojeID – An identity authentication request has to contain at least openid as a required group of data.
Required data from MojeID – An identity authentication request can also include a list of individual data from the MojeID identity which your application requires and which are handed over to your application with the user’s consent after a successful login. For each piece of data, its identifier needs to be presented. The data and its identifiers are listed in Appendix 1 – List of Data to be Handed Over (OpenID Connect). This list has a JSON format specified in the OpenID Connect documentation. Any item can be marked as required using an expression
"essential": true.
Examples of items that can be included in the identity authentication request are listed in the following table:
Parameter (key) |
Description and value |
|---|---|
|
List of required groups of data |
|
Determining the required authentication schema |
|
Unique service provider’s identifier |
|
Return address from MojeID. |
|
More detailed specification of the required data. {"userinfo":
{"name": null,
"nickname": {"essential": true}}
}
|
Example of an authentication request:
sid, location = client.begin(path=URL, scope=SCOPE)
HttpResponseRedirect(location)
Example of an authentication request query:
GET /oidc/authorization/?response_type=code&scope=openid%20profile%20email&client_id=s6BhdRkqt3&state=af0ifjsldkj&redirect_uri=https%3A%2F%2Fclient.example.org%2Fcb HTTP/1.1
Host: mojeid.cz
GET /oidc/authorization/?state=950ba54cb302a7c6a814f22a4e5c5445&redirect_uri=https%3A%2F%2Fmojeid.cz%3A8000%2Fconsumer%2Foic%2Ffinish%2F&response_type=code&client_id=8ol68PATaSpA&scope=openid&claims=%7B%22userinfo%22%3A+%7B%22name%22%3A+null%2C+%22nickname%22%3A+%7B%22essential%22%3A+true%7D%7D%7D&ui_locales=off HTTP/1.1
Host: mojeid.cz
The response from the server comes only after the authetication is performed. Example of the response can be found in the Response to Authentication section.
4.1.7. Performing Authentication
When a user comes to the MojeID server with a identity verification request, they see a login page where the login takes place.

MojeID login page
This authentication is performed by the MojeID servers. Within this authentication, we will try to perform as many tasks specified by the parameters in the identity authentication request as possible. The whole process takes place exclusively within the MojeID systems and requires no activity from your side.
4.1.8. Response to Authentication
When a user completes the authentication process, you will receive a response with its result from the MojeID servers. The structure and contents of this response differs based on the selected communication schema (see Communication via OpenID Connect).
In case of communication via the Implicit schema, the response includes the user’s identifier and ID Token which can contain data about the user.
In case of communication via Access code or Hybrid schema, the response contains an access code that needs to be used in the next step of the authentication process.
An example of processing the response:
aresp, _, _ = client.parse_authz(request.GET.urlencode())
An example of the server’s response:
HTTP/1.1 302 Found
Location: https://client.example.org/cb?code=SplxlOBeZQQYbYS6WxSbIA&state=af0ifjsldkj
4.1.9. Requesting Token
If you received an access code in the previous step of authentication, you have to replace it with a valid token at the Token Endpoint.
In case of communication via the Hybrid schema, the response includes an access token and ID Token which can contain data about the user. In this case, the authentication and data transfer process is complete.
In case of communication via an Access code, the response again includes a token and ID Token, but it does not contain any data about the user. You have to request them in the next step.
An example of communication:
POST /oidc/token/ HTTP/1.1
Host: mojeid.cz
Content-Type: application/x-www-form-urlencoded
Authorization: Basic czZCaGRSa3F0MzpnWDFmQmF0M2JW

grant_type=authorization_code&code=SplxlOBeZQQYbYS6WxSbIA&redirect_uri=https%3A%2F%2Fclient.example.org%2Fcb
HTTP/1.1 200 OK
Content-Type: application/json
Cache-Control: no-store
Pragma: no-cache

{
 "access_token": "SlAV32hkKG",
 "token_type": "Bearer",
 "refresh_token": "8xLOxBtZp8",
 "expires_in": 3600,
 "id_token": "eyJhbGciOiJSUzI1NiIsImtpZCI6IjFlOWdkazcifQ.ewogImlzc
              yI6ICJodHRwOi8vc2VydmVyLmV4YW1wbGUuY29tIiwKICJzdWIiOiAiMjQ4Mjg5
              NzYxMDAxIiwKICJhdWQiOiAiczZCaGRSa3F0MyIsCiAibm9uY2UiOiAibi0wUzZ
              fV3pBMk1qIiwKICJleHAiOiAxMzExMjgxOTcwLAogImlhdCI6IDEzMTEyODA5Nz
              AKfQ.ggW8hZ1EuVLuxNuuIJKX_V8a_OMXzR0EHR9R6jgdqrOOF4daGU96Sr_P6q
              Jp6IcmD3HP99Obi1PRs-cwh3LO-p146waJ8IhehcwL7F09JdijmBqkvPeB2T9CJ
              NqeGpe-gccMg4vfKjkM8FcGvnzZUN4_KSP0aAp1tOJ1zZwgjxqGByKHiOtX7Tpd
              QyHE5lcMiKPXfEIQILVq0pc_E2DzL7emopWoaoZTF_m0_N0YzFC6g6EJbOEoRoS
              K5hoDalrcvRYLSrQAZZKflyuVCyixEoV9GfNQC3_osjzw2PAithfubEEBLuVVk4
              XUVrWOLrLl0nx7RkKU8NXNHq-rvKMzqg"
}
4.1.10. Requesting Data
In this step you will use the token received in the previous authentication step to get the user’s data. The data needs to be retrieved from the UserInfo Endpoint.
The UserInfo Endpoint always returns an attribute sub (subject),
in the response which uniquely identifies the user and should be used to validate the response using an ID Token.
The user’s data should be processed only in case the response is found valid.
An example of requesting data:
state = aresp.to_dict()['state']
resp = client.complete(state)
uinfo = client.get_user_info(state)
An example of communication with server:
GET /oidc/userinfo/ HTTP/1.1
Host: mojeid.cz
Authorization: Bearer SlAV32hkKG
HTTP/1.1 200 OK
Content-Type: application/json

{
 "sub": "248289761001",
 "name": "Jane Doe",
 "given_name": "Jane",
 "family_name": "Doe",
 "preferred_username": "j.doe",
 "email": "janedoe@example.com"
}
4.1.11. MojeID LITE Library
Javascript library MojeID LITE (or also MojeID Connect) allows to load data from a MojeID identity to a website on the client’s side using the OpenID Connect protocol.
This feature can be used, for example, to simply prefill a web form with data of a user with an active MojeID account.
To enable this feature in your web form, you have to perform at least the following steps:
Insert a link to the library.
If you want to decrease your dependency on an external website, you can upload this library to your own website. The library can be downloaded here. The library depends on a cryptographic library jsrsasign which is available (in its newest version) on our webiste, so you do not have to insert it directly. The code of the script to insert the library has to be inside
<HEAD>.An example of inserting the library:
<script type="text/javascript"
   src="https://www.mojeid.cz/public/media/1542958574/150/"
   data-jsrsasign="https://www.mojeid.cz/public/media/1542956522/149/">
</script>
Call a function for creating a MojeidConnect object.
This object represents communication with MojeID server. When calling the creating function, you can set certain parameters, that will affect the data transfer process. The code of the script to call the function has to be inside
<HEAD>.An example of creating the object:
<script type="text/javascript"> (function() {
   mojeid = createMojeidConnect( {
      clientName: "Sample form",
      claims: ['phone_number', 'family_name', 'given_name', 'nickname',
         'email', 'address', 'birthdate', 'gender', 'website', 'profile']
   } );
})();</script>
Attach calling of requestAuthentication() method to the button that activates the prefilling of the form.
This method initiates the authentication process and filling the form with the values of the confirmed data.
An example of a code for the button:
<button onclick="mojeid.requestAuthentication()">
Prefill using MojeID
</button>
createMojeidConnect(options) function parameters
When calling this function, you can set certain parameters (in dictionary structure) that will affect communication with the MojeID server:
clientId
It is possible that the service is already registered in the MojeID server. If yes, this service has a clientId assigned and you can provide it in the parameter. If the clientId parameter is not defined, registration is completed dynamically according to the OpenID Connect specifications using the address from the
regEndpointparameter. Caution: automatic (dynamic) registration cannot be used for Full access.
clientName
In case of dynamic registration, it is possible to define the name of the service that is shown to the user upon data transfer approval. If the name is not defined, the service’s URL is used.
scope
Required transferred data in form of a group of data. The value is a sublist
['openid', 'profile', 'email',
'phone', 'address']
, while'openid'is required. If it is not defined, the value is['openid'].
claims
Required transferred data in form of individual attributes. The value is a list of attributes. A full list of possible attributes is available in the value of
claims_supportedfrom server’s configuration file. An example of a list:['phone_number', 'family_name', 'given_name', 'nickname', 'email', 'address', 'birthdate', 'gender', 'website', 'profile']
attrDict
The library assumes the form items have the same
idas the name of the attribute from theclaimslist. If that is not the case, it is possible to define a map list for the form item id and for the attribute name in this parameter.
formCallback
If the map dictionary from
attrDictis not sufficient, you can define a name of your own JS function that will take care of filling the form.
display
The value is either
popuporredirectbased on whether the login should be done in a new window or in the existing one. The default value ispopup.
regEndpoint
Registration endpoint’s URL according to the OpenID Connect protocol specification. The default value is
https://mojeid.cz/oidc/registration/.
authEndpoint
Authentication endpoint’s URL according to the OpenID Connect protocol specification. The default value is
https://mojeid.cz/oidc/authorization/.
Sample form
For easier understanding, you can have a look at and try a full form sample.
4.1.12. Identity verification request with a NIA-paired account
Identity verification request with a NIA-paired MojeID account is requested
using acr_values parameter. Values for requesting specific level of
assurance are summed in the table below.
ACR value |
Description |
|---|---|
|
eIDAS level of assurance “substantial” |
|
eIDAS level of assurance “high” |
Detailed information about acr_values can be found in the OpenID Connect documentation on the following links:
4.2. Implementation via SAML
SAML is a protocol that historically precedes the newer OpenID protocols. If your system already supports SAML (for example an installation of Shibboleth system or similar), it is also possible to use this protocol to enable MojeID.
SAML 2.0 implementation is based on specifications available at https://wiki.oasis-open.org/security/FrontPage
To enable MojeID, you need to send the service’s metadata to techsupport@mojeid.cz, and you might also need to register MojeID metadata listed at https://mojeid.cz/saml/idp.xml. The certificate listed in metadata can change, so the metadata need to be updated from time to time. Metadata signature can be verified using the certificate at https://mojeid.cz/saml/cert.
Because SAML messages are base64-encoded and deflated, you can convert them to a readable XML for the debugging purposes (you can use for example https://www.samltool.com/decode.php).
The list of data that can be transferred by the protocol (including their identifiers) is available in the Appendix 3 – List of Data to be Handed Over (SAML) and Appendix 4 – List of Data to be Handed Over (SAML specs.nic.cz).
Examples and solutions of error messages can be found in the Appendix 6 – Examples and Solution of Error Messages.
4.2.1. Identity verification request with a NIA-paired account
Identity verification request with a NIA-paired MojeID account is requested using
AuthnContextClassRef (Authentication Context Class Reference) class.
Values for requesting specific level of assurance are summed in the table below.
AuthnContextClassRef |
Description |
|---|---|
|
eIDAS level of assurance “substantial” |
|
eIDAS level of assurance “high” |
Usage example:
<saml:AuthnContextClassRef xmlns:saml="urn:oasis:names:tc:SAML:2.0:assertion">
    http://eidas.europa.eu/LoA/substantial
</saml:AuthnContextClassRef>
4.3. Problems with Implementation
This section informs about some possible problems with implementation and offers ways to solve them or avoid them.
4.3.1. Differences Between the Protocols
A major difference between the protocols is that each protocol can hand over only certain data from the MojeID identity and the set of data is different for each protocol.
We work on their unification, but at this moment, it is not possible to hand over all the identity data using each supported protocol.
The data that are handed over for each protocol are listed in the following appendices:
4.3.2. Transition to a Different Protocol
In general, the transition to a different protocol is performed by the user logging in to a service using one of the current login methods and then they login again using the new protocol. This way, the service provider can assign the existing user a new protocol identifier.
Transition from OpenID 2.0 protocol to the new OpenId Connect protocol
If you want to transition from the original OpenID 2.0 protocol to the latest OpenID Connect, send an identity authentication request via the OpenID Connect protocol with the scope parameter extended with an openid2 value, and you will receive an OpenID 2.0 identity together with an OpenID Connect identity.
More details about the migration process can be found in these specifications.
4.3.3. Adjusting Communication with MojeID Server
To debug communication issues, we recommend to use developer tools in the internet browser. They enable checking network activities: queries and responses exchanged between the client (your implementation) and the MojeID server. This can help you detect a possible error in the data that are handed over.
Note
For more complicated issues, when you have to contact out technical support, it is useful to attach a recorded communication log to the description of the issue.
In Firefox, you can use built-in tools or extensions (e.g. FireBug):
The developers tools can be enabled in or by a shortcut Ctrl+Shift+I.
Then you switch to the Network tab (or call this tab directly using the shortcut Ctrl+Shift+Q).
In Chrome, you can use built-in tools:
The developers tools can be enabled in or by a shortcut Ctrl+Shift+I.
Then switch to the Network tab.
4.3.3.1. Debugging in a Pop-up Window
If you implement the user authentication via MojeID using a new pop-up window, you need to do the following to record the communication:
Let the pop-up window generate for the first time.
Before sending the request to the MojeID server, right click inside it and open the debug tool by choosing the following item in the menu:
Chromium: Inspect
Firefox: Inspect Element
FireBug plugin: Inspect Element in Firebug
Call a pop-up window refresh (e.g. F5 or Ctrl+R).
Continue reporting network communication in the debug tool in a normal way.
5. Interface for Creating MojeID Accounts
This chapter describes the process of registration MojeID accounts via your application.
5.1. Requesting Creation of a MojeID Account
The user selects an option of creating a MojeID account within your application. That will generate
a HTTPS POST request to a registration server in user’s browser at https://direct.mojeid.cz/registration/direct/.
The parameters of the request contain a username and all the other available data about the user
(the list of data for registration include Appendix 5 – List of Data for Registration), plus:
the service provider identifier (realm) – a selectable URI with a value based on the type of the communication protocol:
in case of OpenID Connect, it must be the assigned
client_id,
unique transaction identifier (
registration_nonce) – used to match the response to this request.
You also have the possibility to offer the user a transfer of an existing account in the central register
by choosing the address https://mojeid.cz/transfer/endpoint/. In such case, the data about the user are ignored
and the username (= contact identifier) that cannot be changed is used. If the identifier is invalid,
it cannot be transferred to MojeID and the user has to contact the current registrator to ask for change.
Then the user is displayed a list of data to be entered into MojeID once the registration is completed. The basic data also shows its value and it can be changed. The user will then consent to the service usage policy within the registration form and it will be verified with CAPTCHA.
5.2. Checking Data Validity
After a registration form is submitted, the registration server checks data validity and asks the user to correct any errors. In case the data is valid, the process of registration of a new account is initiated. The registration server saves all the necessary data in this account and adds your identification (service provider identifier, realm). Then, the identification of the user starts with sending verification codes to e-mail and phone number.
The next step is informing your application of a successful registration.
In case of communication via OpenID Connect,
the URL for sending information must be entered during the client registration process using
the assertion_uris key that contains a list of addresses (encrypted in a JSON) to send the messages to.
Your application directly sends a HTTPS POST message to the interface determined by the URL. The message contains three parameters:
registration_nonce– a unique transaction identifier for matching with the original request,MojeID user’s identifier:
sub– in case of the OpenID Connect protocol,
status– status with the valueREGISTERED.
Your application first has to verify this message:
It has to check if the message was delivered to one of the addresses listed in the Requesting Creation of a MojeID Account of a MojeID Account section.
It has to check if the
registration_noncetransaction was really created.It must verify that the client certificate used to create the SSL tunnel is valid and signed by the CZ.NIC certification authority. If you do not have such a certificate, please send us the service provider identifier (clientID) to techsupport@mojeid.cz. We will create and send the certificate to you.
If you do not use HTTPS and you want to try logging in and creating accounts in the test environment, you do not need this certificate.
If you use HTTPS and you are in the test environment, you need this certificate to send notifications from registration. It is not needed for logging in (only general public data is transferred between MojeID and your server, so it is not necessary to check the “identity” of the requester).
The notifications are sent after registration, partial identification (verified e-mail and phone)
and identification (entered PIN3, until 2024 only) to assert_url listed in the XRDS document in the realm.
This works also in the test environment. If you want your application to be able to receive notifications,
you need a realm with HTTPS. When the notification is received,
it is necessary to response with a 'mode:accept\n' string, where the new lines are marked with \n.
Tip
The client certificate verification can be done by an HTTP server,
e.g. Apache with the SSLVerifyClient configuration option.
If all the requirements are met, your application can match the MojeID identifier with its record of the user during the processing of this message for the purpose of authentication via MojeID.
Note
If this message cannot be sent securely using HTTPS, the registration continues without sending this message.
5.3. Completing Registration
Your application sends a response to the message from the Checking Data Validity section in the body of a HTTP response in a form of key-value of the OpenID protocol
outcome (
mode) – valueacceptorrejectindicating, whether the user’s account was successfully paired,reason for denial (
reason) – an optional parameter that includes the reason the pairing was not performed.
If a response in the correct format is not received, the message with the result of the registration will be sent to another address from the Checking Data Validity section, until a response is obtained or until all the addresses are used.
The registration then continues either with a direct request to verify e-mail and phone number and going to the user’s profile where they choose a password, or the user is shown an information about the completion of the registration.
If you have activated the full access, your application will also receive information about a change of the status of the user’s account. These messages are sent in a similar way as described in the Checking Data Validity section, with two parameters in each message:
- MojeID user’s identifier:
sub– in case of OpenID Connect.
status– account status, one of the following values:CONDITIONALLY_IDENTIFIED– partially identified (PIN1 and PIN2 entered).Account with verified e-mail and phone number.
PIN1 and PIN2 entered for accounts up to 2024.
IDENTIFIED– identified (PIN1, PIN2 and PIN3 entered [1]).Only for accounts up to 2024.
VALIDATED– validated (account with validation flag.)Validated account of a business person or natural person’s account connected to the public administration services (NIA).
For accounts up to 2024 this means entered PIN1, PIN2, PIN3 [2] and the validation flag.
If this message cannot be sent or no response is received, the information of the change of state will be sent repeatedly each five minutes for the period of six hours, until your application accepts or refuses it. On the other hand, the message about the completion of the registration is synchronous – it is sent only once.
As of July 2022 personal accounts cannot be verified using PIN3. PIN3 verification is available only to accounts with the Organization field filled in.
Important
Since 2024 PIN1, PIN2 and PIN3 are not used for verification.
6. Logging out of MojeID
It is logical based on the way MojeID works that your service cannot automatically log a user out because it would log them out of other services they are logged into via MojeID too. However, in rare cases, a user might need to be logged out of MojeID too. For example, when they logged in from someone else’s device.
Then it is desirable that upon or after logging out of your service, the user is asked if they want to be logged out of MojeID too.
If the user chooses this option,
redirect them or provide a link to https://mojeid.cz/logout/ where they can confirm the logout.
We recommend implementing this option if users often access your service from public devices (e.g. in a library or internet café) and if it is not securely solved, e.g. by deleting data after finishing working with the browser.
However, its implementation is not mandatory.
7. MojeID Test Instance
It is possible to test your implementation using our MojeID test instance where you can test logging of MojeID users, registering of new accounts and transferring of accounts from the central register.
Before you start testing, send the metadata you are going to use for testing to techsupport@mojeid.cz. This metadata differs for each protocol (see infomation about the individual protocols below).
Important
Use different metadata than for the production instance!
We will grant you access to the test instance and set up a so-called full access,
for the purpose of testing, so that you can receive all the MojeID account data, including status, valid
and more that are transferred only to the providers with full access.
7.1. Test Accounts
To test MojeID, we recommend creating three test users with different levels of verification. Use the manual on the main page of MojeID public test instance to create the accounts. You can fill in any contact and personal information.
- Partially identified account:
Account with verified e-mail and phone number.
- Natural person’s account connected to public administration services:
To connect test account to public administration services you will need a certified hardware or system security key.
Create an account for personal use.
Click
Verify identity, thenVerify differentlyand selectTest Profile High.Choose any test profile and complete the verification.
- Validated account of a business person / organization:
Create an account for business use.
Go to the tab with personal information and click
Validate.Download the generated PDF document and send it to techsupport@mojeid.cz.
We will set the validation flag for this account.
This allows you to test returned values in the status parameter for all current
account verification types.
7.2. Mutual Endpoints
Part of the interface addresses does not depend on the selected protocol. Those addresses are listed here. However, you will also need addresses of endpoints specific for individual protocols that are listed below.
A test instance with more detailed outputs in case of errors is available at the following addresses:
Registering a new MojeID account:
https://mojeid.regtest.nic.cz/registration/endpoint/Transferring a contact to MojeID from the domain registry:
https://mojeid.regtest.nic.cz/transfer/endpoint/
The following addresses will be available to implement MojeID to production environment:
Registering a new MojeID account:
https://mojeid.cz/registration/endpoint/Transferring a contact to MojeID from the domain registry:
https://mojeid.cz/transfer/endpoint/
7.3. OpenID Connect
Metadata that need to be sent to support
Client_IDyou will use for testing – a combination of 12 characters (lower- and uppercase letters and digits) generated automatically upon the registration of the service
Specific endpoints for the protocol
- Addresses of the test endpoints:
Registration Endpoint:
https://mojeid.regtest.nic.cz/oidc/registration/Authorization Endpoint:
https://mojeid.regtest.nic.cz/oidc/authorization/Token Endpoint:
https://mojeid.regtest.nic.cz/oidc/token/UserInfo Endpoint:
https://mojeid.regtest.nic.cz/oidc/userinfo/
A full description of OIDC configuration in JSON: https://mojeid.regtest.nic.cz/.well-known/openid-configuration/
- Addresses of the production endpoints:
Registration Endpoint:
https://mojeid.cz/oidc/registration/Authorization Endpoint:
https://mojeid.cz/oidc/authorization/Token Endpoint:
https://mojeid.cz/oidc/token/UserInfo Endpoint:
https://mojeid.cz/oidc/userinfo/
A full description of OIDC configuration in JSON: https://mojeid.cz/.well-known/openid-configuration/
7.4. SAML
The metadata of the test instance are available at: https://mojeid.regtest.nic.cz/saml/idp.xml
Metadata that need to be sent to support
string
entityIDyou will use for testing – maximal length 1024 characters, specifications recommend the string to be in a form of URL and to include a domain name of the provider or the provided serviceExample:
https://sluzba.example.czan XML file with the service metadata (
EntityDescriptor), that contains the sameentityIDYou can find more details on how to get the file with metadata in this article about metadata preparation.
Endpoints specific for the protocol
test endpoint:
https://mojeid.regtest.nic.cz/saml/production endpoint:
https://mojeid.cz/saml/
8. Appendices
8.1. Appendix 1 – List of Data to be Handed Over (OpenID Connect)
Data |
Claim identifier |
Data type |
|---|---|---|
OpenID2 identifier for migration from an older protocol |
openid2_id |
|
Name |
||
Whole name |
name |
|
First name |
given_name |
|
Surname |
family_name |
|
Nickname |
nickname |
|
Main |
||
Flag – email verified |
email_verified |
|
Notify |
mojeid_email_notify |
|
Other |
mojeid_email_next |
|
Home address |
||
Full address |
mojeid_address_def |
|
Street |
mojeid_address_def_street |
|
Street 2 |
mojeid_address_def_street2 |
|
Street 3 |
mojeid_address_def_street3 |
|
City |
mojeid_address_def_city |
|
State |
mojeid_address_def_state |
|
ZIP code |
mojeid_address_def_postal_code |
|
Country |
mojeid_address_def_country |
|
Mailing address |
||
Full address |
address |
|
Street |
mojeid_address_mail_street |
|
Street 2 |
mojeid_address_mail_street2 |
|
Street 3 |
mojeid_address_mail_street3 |
|
City |
mojeid_address_mail_city |
|
State |
mojeid_address_mail_state |
|
ZIP code |
mojeid_address_mail_postal_code |
|
Country |
mojeid_address_mail_country |
|
Flag – address verified |
mojeid_address_mail_verified |
|
Billing address |
||
Full address |
mojeid_address_bill |
|
Street |
mojeid_address_bill_street |
|
Street 2 |
mojeid_address_bill_street2 |
|
Street 3 |
mojeid_address_bill_street3 |
|
City |
mojeid_address_bill_city |
|
State |
mojeid_address_bill_state |
|
ZIP code |
mojeid_address_bill_postal_code |
|
Country |
mojeid_address_bill_country |
|
Shipping address |
||
Full address |
mojeid_address_ship |
|
Company name |
mojeid_address_ship_company_name |
|
Street |
mojeid_address_ship_street |
|
Street 2 |
mojeid_address_ship_street2 |
|
Street 3 |
mojeid_address_ship_street3 |
|
City |
mojeid_address_ship_city |
|
State |
mojeid_address_ship_state |
|
ZIP code |
mojeid_address_ship_postal_code |
|
Country |
mojeid_address_ship_country |
|
Phone |
||
Mobile |
phone_number |
|
Flag – mobile verified |
phone_number_verified |
|
Other |
mojeid_phone_mobile |
|
Home |
mojeid_phone_home |
|
Work |
mojeid_phone_office |
|
Fax |
mojeid_phone_fax |
|
Other data |
||
Date of birth |
birthdate |
|
Gender |
gender |
|
Age |
mojeid_age |
|
ID number |
mojeid_ident_card |
|
Passport number |
mojeid_ident_pass |
|
MPSV identifier |
mojeid_ident_ssn |
|
ISIC card number |
mojeid_isic |
|
Flag – older than 18 |
mojeid_is_adult |
|
Flag – student |
mojeid_student |
|
Flag – validation |
mojeid_valid |
|
Organization |
mojeid_organization |
|
VAT (DIČ) |
mojeid_vat |
|
VAT (IČO) |
mojeid_ident_vat |
|
Public PGP key |
mojeid_public_pgp |
|
Bank account |
mojeid_bank_account |
|
Bank account (IBAN) |
mojeid_bank_account_iban |
|
Data box |
mojeid_isds |
|
Flag - NIA |
mojeid_nia |
|
Unique login transaction identifier |
txn |
|
URL |
||
Main |
profile |
|
Personal |
website |
|
Blog |
mojeid_url_blog |
|
Work |
mojeid_url_office |
|
RSS |
mojeid_url_rss |
|
mojeid_url_facebook |
||
mojeid_url_twitter |
||
mojeid_url_linkedin |
||
mojeid_url_instagram |
||
mojeid_url_pinterest |
||
tumblr |
mojeid_url_tumblr |
|
wordpress |
mojeid_url_wordpress |
|
foursquare |
mojeid_url_foursquare |
|
youtube |
mojeid_url_youtube |
|
blogger |
mojeid_url_blogger |
|
gravatar |
mojeid_url_gravatar |
|
about_me |
mojeid_url_about_me |
|
Flickr |
mojeid_url_flickr |
|
Vimeo |
mojeid_url_vimeo |
|
IM |
||
ICQ |
mojeid_im_icq |
|
Skype |
mojeid_im_skype |
|
Jabber |
mojeid_im_jabber |
|
Hangouts |
mojeid_im_google_talk |
|
Windows Live |
mojeid_im_windows_live |
- SINGLE_OPTIONAL_BOOLEAN
Boolean or null
- SINGLE_OPTIONAL_INT
Whole number or null
- SINGLE_OPTIONAL_STRING
String or null
- OPTIONAL_ADDRESS
Object or null
OPTIONAL_ADDRESS object schema¶{ "formatted": SINGLE_OPTIONAL_STRING, "street_address": SINGLE_OPTIONAL_STRING, "locality": SINGLE_OPTIONAL_STRING, "region": SINGLE_OPTIONAL_STRING, "postal_code": SINGLE_OPTIONAL_STRING, "country": SINGLE_OPTIONAL_STRING, }- OPTIONAL_ADDRESS_STRING
String or null; string contains a serialized object OPTIONAL_ADDRESS, e.g.
"{\"formatted\": \"Sunny 5, Prague\"}".
8.2. Appendix 3 – List of Data to be Handed Over (SAML)
Data |
Identifier (URI format) |
Identifier (BASIC format) |
|---|---|---|
Name |
||
Whole name |
urn:oid:2.5.4.3 |
urn:mace:dir:attribute-def:cn |
First name |
urn:oid:2.5.4.42 |
urn:mace:dir:attribute-def:givenName |
Surname |
urn:oid:2.5.4.4 |
urn:mace:dir:attribute-def:sn |
Nickname |
urn:oid:2.5.4.65 |
urn:mace:dir:attribute-def:pseudonym |
Main |
urn:oid:0.9.2342.19200300.100.1.3 |
urn:mace:dir:attribute-def:mail |
Home address |
||
Full address |
urn:oid:2.5.4.16 |
urn:mace:dir:attribute-def:postalAddress |
Street |
urn:oid:2.5.4.9 |
urn:mace:dir:attribute-def:street |
City |
urn:oid:2.5.4.7 |
urn:mace:dir:attribute-def:l |
State |
urn:oid:2.5.4.8 |
urn:mace:dir:attribute-def:st |
Country |
urn:oid:2.5.4.6 |
urn:mace:dir:attribute-def:c |
ZIP code |
urn:oid:2.5.4.17 |
urn:mace:dir:attribute-def:postalCode |
Phone |
||
Mobile |
urn:oid:2.5.4.20 |
urn:mace:dir:attribute-def:telephoneNumber |
Fax |
urn:oid:2.5.4.23 |
urn:mace:dir:attribute-def:facsimileTelephoneNumber |
Other data |
||
Date of birth |
urn:oid:1.3.6.1.4.1.2428.90.1.3 |
urn:mace:dir:attribute-def:norEduPersonBirthDate |
Age |
http://www.stork.gov.eu/1.0/age |
|
Gender |
urn:oid:1.3.6.1.4.1.25178.1.2.2 |
|
Image (base64) |
urn:mace:dir:attribute-def:photo |
|
Company name |
urn:oid:2.5.4.10 |
urn:mace:dir:attribute-def:o |
URL |
||
Main |
urn:oid:1.3.6.1.4.1.27630.2.1.1.17 |
|
Work |
urn:oid:1.3.6.1.4.1.27630.2.1.1.120 |
|
Data |
Identifier (URI formát) |
|---|---|
eduID |
|
eduPersonPrincipalName |
urn:oid:1.3.6.1.4.1.5923.1.1.1.6 |
eduPersonScopedAffiliation |
urn:oid:1.3.6.1.4.1.5923.1.1.1.9 |
eduPersonTargetedID |
urn:oid:1.3.6.1.4.1.5923.1.1.1.10 |
eduPersonUniqueId |
urn:oid:1.3.6.1.4.1.5923.1.1.1.13 |
8.3. Appendix 4 – List of Data to be Handed Over (SAML specs.nic.cz)
Date |
Identifier |
|---|---|
Name |
|
Whole name |
http://specs.nic.cz/attr/contact/name |
First name |
http://specs.nic.cz/attr/contact/name/first |
Surname |
http://specs.nic.cz/attr/contact/name/last |
Nickname |
http://specs.nic.cz/attr/contact/nickname |
Main |
http://specs.nic.cz/attr/email/main |
Notify |
http://specs.nic.cz/attr/email/notify |
Other |
http://specs.nic.cz/attr/email/next |
Home address |
|
Street |
http://specs.nic.cz/attr/addr/main/street |
Street2 |
http://specs.nic.cz/attr/addr/main/street2 |
Street3 |
http://specs.nic.cz/attr/addr/main/street3 |
City |
http://specs.nic.cz/attr/addr/main/city |
State |
http://specs.nic.cz/attr/addr/main/sp |
Country |
http://specs.nic.cz/attr/addr/main/cc |
ZIP code |
http://specs.nic.cz/attr/addr/main/pc |
Mailing address |
|
Street |
http://specs.nic.cz/attr/addr/mail/street |
Street2 |
http://specs.nic.cz/attr/addr/mail/street2 |
Street3 |
http://specs.nic.cz/attr/addr/mail/street3 |
City |
http://specs.nic.cz/attr/addr/mail/city |
State |
http://specs.nic.cz/attr/addr/mail/sp |
Country |
http://specs.nic.cz/attr/addr/mail/cc |
ZIP code |
http://specs.nic.cz/attr/addr/mail/pc |
Flag – address verified |
http://specs.nic.cz/attr/addr/mail/verified |
Billing address |
|
Street |
http://specs.nic.cz/attr/addr/bill/street |
Street2 |
http://specs.nic.cz/attr/addr/bill/street2 |
Street3 |
http://specs.nic.cz/attr/addr/bill/street3 |
City |
http://specs.nic.cz/attr/addr/bill/city |
State |
http://specs.nic.cz/attr/addr/bill/sp |
Country |
http://specs.nic.cz/attr/addr/bill/cc |
ZIP code |
http://specs.nic.cz/attr/addr/bill/pc |
Shipping address |
|
Company |
http://specs.nic.cz/attr/addr/ship/company_name |
Street |
http://specs.nic.cz/attr/addr/ship/street |
Street2 |
http://specs.nic.cz/attr/addr/ship/street2 |
Street3 |
http://specs.nic.cz/attr/addr/ship/street3 |
City |
http://specs.nic.cz/attr/addr/ship/city |
State |
http://specs.nic.cz/attr/addr/ship/sp |
Country |
http://specs.nic.cz/attr/addr/ship/cc |
ZIP code |
http://specs.nic.cz/attr/addr/ship/pc |
Phone |
|
Mobile |
http://specs.nic.cz/attr/phone/main |
Other |
http://specs.nic.cz/attr/phone/mobile |
Home |
http://specs.nic.cz/attr/phone/home |
Work |
http://specs.nic.cz/attr/phone/work |
Fax |
http://specs.nic.cz/attr/phone/fax |
Other data |
|
Date of birth |
http://specs.nic.cz/attr/contact/ident/dob |
Age |
http://specs.nic.cz/attr/contact/age |
Gender |
http://specs.nic.cz/attr/contact/gender |
ID number |
http://specs.nic.cz/attr/contact/ident/card |
Passport number |
http://specs.nic.cz/attr/contact/ident/pass |
MPSV identifier |
http://specs.nic.cz/attr/contact/ident/ssn |
ISIC card number |
http://specs.nic.cz/attr/contact/isic |
Flag – older than 18 |
http://specs.nic.cz/attr/contact/adult |
Flag – student |
http://specs.nic.cz/attr/contact/student |
Flag – validation |
http://specs.nic.cz/attr/contact/valid |
Account status |
http://specs.nic.cz/attr/contact/status |
Image (base64) |
http://specs.nic.cz/attr/contact/image |
Company name |
http://specs.nic.cz/attr/contact/org |
VAT (IČO) |
http://specs.nic.cz/attr/contact/ident/vat_id |
VAT (DIČ) |
http://specs.nic.cz/attr/contact/vat |
Public PGP key |
http://specs.nic.cz/attr/public_pgp |
Bank account |
http://specs.nic.cz/attr/bank/national |
Bank account (IBAN) |
http://specs.nic.cz/attr/bank/iban |
Data box |
http://specs.nic.cz/attr/contact/isds |
Flag - NIA |
http://specs.nic.cz/attr/contact/nia |
Internet addresses |
|
Main |
http://specs.nic.cz/attr/url/main |
Blog |
http://specs.nic.cz/attr/url/blog |
Personal |
http://specs.nic.cz/attr/url/personal |
Work |
http://specs.nic.cz/attr/url/work |
RSS |
http://specs.nic.cz/attr/url/rss |
http://specs.nic.cz/attr/url/facebook |
|
http://specs.nic.cz/attr/url/twitter |
|
http://specs.nic.cz/attr/url/linkedin |
|
http://specs.nic.cz/attr/url/instagram |
|
http://specs.nic.cz/attr/url/pinterest |
|
tumblr |
http://specs.nic.cz/attr/url/tumblr |
wordpress |
http://specs.nic.cz/attr/url/wordpress |
foursquare |
http://specs.nic.cz/attr/url/foursquare |
youtube |
http://specs.nic.cz/attr/url/youtube |
blogger |
http://specs.nic.cz/attr/url/blogger |
gravatar |
http://specs.nic.cz/attr/url/gravatar |
about_me |
http://specs.nic.cz/attr/url/about_me |
Flickr |
http://specs.nic.cz/attr/url/flickr |
Vimeo |
http://specs.nic.cz/attr/url/vimeo |
Instant Messaging |
|
ICQ |
http://specs.nic.cz/attr/im/icq |
Skype |
http://specs.nic.cz/attr/im/skype |
Jabber |
http://specs.nic.cz/attr/im/jabber |
Hangouts |
http://specs.nic.cz/attr/im/google_talk |
Windows Live |
http://specs.nic.cz/attr/im/windows_live |
8.4. Appendix 5 – List of Data for Registration
Data |
Format |
Registration |
|---|---|---|
Name |
||
First name |
string (max 50 characters) |
first_name |
Surname |
string (max 50 characters) |
last_name |
Main |
email address (max 200 characters) STD-EMAIL |
email__default__email |
Notification |
email address (max 200 characters) STD-EMAIL |
email__notify__email |
Other |
email address (max 200 characters) STD-EMAIL |
email__next__email |
Home address |
||
Street |
string (max 200 characters) |
address__default__street1 |
Street2 |
string (max 200 characters) |
address__default__street2 |
Street3 |
string (max 200 characters) |
address__default__street3 |
City |
string (max 200 characters) |
address__default__city |
State |
string (max 200 characters) |
address__default__state |
ZIP code |
string (max 50 characters) |
address__default__postal_code |
Country |
kód Country podle ISO3166 STD-COUNTRY |
address__default__country |
Billing address |
||
Street |
string (max 200 characters) |
address__billing__street1 |
Street2 |
string (max 200 characters) |
address__billing__street2 |
Street3 |
string (max 200 characters) |
address__billing__street3 |
City |
string (max 200 characters) |
address__billing__city |
State |
string (max 200 characters) |
address__billing__state |
ZIP code |
string (max 50 characters) |
address__billing__postal_code |
Country |
kód Country podle ISO3166 STD-COUNTRY |
address__billing__country |
Shipping address |
||
Company |
string (max 200 characters) |
address__shipping__company_name |
Street |
string (max 200 characters) |
address__shipping__street1 |
Street2 |
string (max 200 characters) |
address__shipping__street2 |
Street3 |
string (max 200 characters) |
address__shipping__street3 |
City |
string (max 200 characters) |
address__shipping__city |
State |
string (max 200 characters) |
address__shipping__state |
ZIP code |
string (max 50 characters) |
address__shipping__postal_code |
Country |
kód Country podle ISO3166 STD-COUNTRY |
address__shipping__country |
Mailing address |
||
Street |
string (max 200 characters) |
address__mailing__street1 |
Street2 |
string (max 200 characters) |
address__mailing__street2 |
Street3 |
string (max 200 characters) |
address__mailing__street3 |
City |
string (max 200 characters) |
address__mailing__city |
State |
string (max 200 characters) |
address__mailing__state |
ZIP code |
string (max 50 characters) |
address__mailing__postal_code |
Country |
kód Country podle ISO3166 STD-COUNTRY |
address__mailing__country |
Phone |
||
Mobile |
string that follows regular expression: ^+[0-9]{1,3}.[0-9]{1,14}$ |
phone__default__number |
Work |
string that follows regular expression: ^+[0-9]{1,3}.[0-9]{1,14}$ |
phone__office__number |
Other |
string that follows regular expression: ^+[0-9]{1,3}.[0-9]{1,14}$ |
phone__mobile__number |
Home |
string that follows regular expression: ^+[0-9]{1,3}.[0-9]{1,14}$ |
phone__home__number |
Phone - Fax |
string that follows regular expression: ^+[0-9]{1,3}.[0-9]{1,14}$ |
phone__fax__number |
Other data |
||
Date of birth |
date in the RFC3339 format (YYYY-MM-DD) STD-DATE |
birth_date |
Gender |
Value “M” or “F” |
gender |
ID number |
string (max 50 characters) |
id_card_num |
Passport number |
string (max 50 characters) |
passport_num |
MPSV identifier |
string (max 50 characters) |
ssn_id_num |
ISIC card number |
string (max 50 characters) |
card_isic |
Company name |
string (max 200 characters) |
organization |
VAT (IČO) |
string (max 50 characters) |
vat_id_num |
VAT (DIČ) |
string (max 50 characters) |
vat_reg_num |
Internet addresses |
||
Main |
string (max 255 characters) |
urladdress__main__url |
Blog |
string (max 255 characters) |
urladdress__blog__url |
Personal |
string (max 255 characters) |
urladdress__personal__url |
Work |
string (max 255 characters) |
urladdress__office__url |
RSS |
string (max 255 characters) |
urladdress__rss__url |
string (max 255 characters) |
urladdress__facebook__url |
|
string (max 255 characters) |
urladdress__twitter__url |
|
string (max 255 characters) |
urladdress__linkedin__url |
|
string (max 255 characters) |
urladdress__instagram__url |
|
string (max 255 characters) |
urladdress__pinterest__url |
|
tumblr |
string (max 255 characters) |
urladdress__tumblr__url |
wordpress |
string (max 255 characters) |
urladdress__wordpress__url |
foursquare |
string (max 255 characters) |
urladdress__foursquare__url |
youtube |
string (max 255 characters) |
urladdress__youtube__url |
blogger |
string (max 255 characters) |
urladdress__blogger__url |
gravatar |
string (max 255 characters) |
urladdress__gravatar__url |
about_me |
string (max 255 characters) |
urladdress__about_me__url |
Instant Messaging |
||
ICQ |
string (max 255 characters) |
imaccount__icq__username |
Skype |
string (max 255 characters) |
imaccount__skype__username |
Windows Live |
string (max 255 characters) |
imaccount__windows_live__username |
Jabber |
string (max 255 characters) |
imaccount__jabber__username |
Hangouts |
string (max 255 characters) |
imaccount__google_talk__username |
8.5. Appendix 6 – Examples and Solution of Error Messages
The following article describes the most common error messages that can occur during the implementation of MojeID. The text also provides recommendations on how to solve the issues or what to focus on.
8.5.1. Error Messages on Test Instance
The errors are rendered directly form the used libraries. The most important ones are described here:
“Error parsing document as XML” and “Not a XRDS document” – Both mean there is an invalid XRDS document. This message usually describes a problem in an XRDS document with an invalid XML code (usually because it contains nonstandard unicode characters). It is possible to check the source code at http://www.xmlvalidation.com and find out where the error is.
“No XRD present in tree” – the XRDS document has no XRD element. Check the contents of the XRDS document (see the xrds). Mind also the case of the letters inside tags!
“HTTP Response status from identity URL host is not 200. Got status XXX” – a query for realm or an XRDS document returned a different HTTP status code than 200.
Errors from cURL are in form of „(XX, …)“, where XX is the number of the error from the list of libcURL errors (see https://curl.haxx.se/libcurl/c/libcurl-errors.html)
8.5.2. Problems Verifying the Return Address
When the verification of the service’s return address fails, the user is shown one of the following messages based on the phase in which the negative outcome occured:
If the connection with a service failed
“Nelze ověřit důvěryhodnost služby, kam se přihlašujete přes MojeID. Buďte zvláště obezřetní při předávání údajů z MojeID této službě.”
“We can not validate authenticity of the service where you want to login with MojeID. Use extra caution when handing over the data from MojeID.”This message is displayed when a query for realm or an XRDS document returns a HTTP status code 4xx or 5xx. If that is not the case, the message can describe a certificate issue when using HTTPS.
For HTTPS to work correctly, it is necessary to have a valid certificate that you can get from a certification authority (see also Problems with Unencrypted Connection). You also need a so-called intermediate certificates, so that the XRDS document is searched for. The server certificate has to be set up correctly, e.g. on an Apache server, intermediate certificates are set up using the SSLCertificateChainFile directive or SSLCertificateFile (see documentation for setting up SSL in Apache.
A list of certification authorities supported by MojeID can be found at https://wiki.mozilla.org/CA/Included_Certificates
When troubleshooting issues with SSL and certificates, you can use direct tools, such as wget or curl programs, or a mechanism of a used library, that can detect issues better than common browsers.
If the connection with a service was successful, but the validation of the return address failed
“Tento požadavek na přihlášení přes MojeID o sobě tvrdí, že přichází z jiné stránky, než tomu ve skutečnosti je. Zvažte, zda vůbec chcete pokračovat s předáváním údajů z vašeho MojeID.”
“This MojeID login request claims to be from other site than it really is. Consider carefully whether you want to continue with handing over the data from your MojeID.”Return address verification can fail due to the following reasons:
Realm did not return HTTP status 200.
There is no XRDS document on the realm, therefore the service cannot be verified. The XRDS document has to be placed on the realm in one of the three following ways:
The XRDS document can be placed directly in the HTTP header,
the XRDS document can be saved directly at the address of the realm (sent directly in the response),
the location can be described in the HTML header in a META tag.
A redirection occurred during the downloading of the XRDS document.
When the address
return_toin an OpenID request does not match the addressreturn_toin the XRDS document. Thereturn_toaddress from an OpenID request can contain only several additional parameters, the so-called query string, not a subdirectory in a path.When the address
return_toin an OpenID request “is not an extension” of the address of the realm.The term address A “is an extension” of address B means that:
the protocol is the same.
the domain is the same or also contains a subdomain if the domain B starts with *.,
the port is the same,
the path is the same or contains a subdirectory, and
query string (?key=value&key2=value2) is the same or with additional parameters.
Claim validity |
Address A |
Address B |
|---|---|---|
yes |
https://example.com/hello/ |
https://example.com/hello/ |
no |
http://example.com/hello/ |
https://example.com/hello/ |
no |
https://example.com:8080/hello/ |
https://example.com/hello/ |
yes |
https://example.com/hello/hi/ |
https://example.com/hello/ |
no |
https://example.com/hello/ |
https://example.com/hi/ |
no |
https://example.com/hello/ |
https://example.com/hello/hi/ |
yes |
https://example.com/hello/?key=value |
https://example.com/hello/?key=value |
yes |
https://example.com/hello/?key=value&key2=value2 |
https://example.com/hello/?key=value |
no |
https://example.com/hello/?key=value |
https://example.com/hello/?key=value&key2=value2 |
yes |
https://subdomain.example.com/hello/?key=value |
https://*.example.com/ |
If it is not possible to manage the URL service’s area in MojeID
“Tento realm není dobře definovaný a nelze k němu nastavit důvěru.”
“This realm is not sane and thus you can not set trust for it.”Check that your realm (described in the identity verificatin request) does not contain an IP address, characters not supported in URL, or a URI fragment. See also realm.
8.5.3. Problems with Unencrypted Connection
Your browser might display the following message when redirecting back to your website:
“Informace, které jste zadali, budou odeslány přes nezašifrované spojení
a mohly by jednoduše být přečteny třetí stranou. Určitě chcete pokračovat
v odesílání?”
“The information you have entered will be sent over an unencrypted connection
and could easily be read by a third party. Are you sure you want to continue
sending it?”
Note
This message comes from Firefox and it will probably look a little different in other browsers.
This message can appear at all realms without HTTPS. The data that are handed over (i.e. user’s personal information too) travel through the internet unencrypted and the browser says it leaves encrypted MojeID website towards a service that does not use encryption. We do not recommend the unencrypted protocol (HTTP), but it is possible to use it.
This issue can be solved easily by using a basic SSL certificate that can be downloaded for example here: https://letsencrypt.org/. The certificate secures your data transfer and at the same time, you see the level of authentication of the user.
8.5.4. Selecting Required Logging Method
The required login method is selected by placing the identifier of the given login method into the identity verification request. The MojeID service supports not only the common login by password, but also login by a digital certificate or a one-time password (OTP).
When loging in using a certificate, the following message is displayed:
“Poskytovatel služby požaduje přihlášení certifikátem.”
“The service provider wants you to login with your certificate.”When logging in using a one-time password or an authenticator, the following message is displayed:
“Poskytovatel služby požaduje přihlášení jednorázovým heslem nebo MojeID Autentikátorem.”
“The service provider wants you to login with one time password or MojeID Autentikátor.”When logging in using a security key, the following message is displayed:
“Poskytovatel služby požaduje přihlášení druhým faktorem.”
“The service provider wants you to login with two-factor authentication.”
Method identifiers and an example of a request with requesting a login method can be found in the implem-oid2-zadost-overeni section.
8.5.5. Problems with Library for PHP
One of the most common error messages is “FAILED TO CREATE AUTH REQUEST: not a valid OpenID” and “Ověření OpenID selhalo: No OpenID information”.
Some errors might be caused by a wrong configuration of your server. You can try to fix them in the following way:
You need to make sure that the cURL for the given PHP version is installed, active (phpinfo should say so) and that the cURL is not disabled in
php.ini.It might also be necessary to check the
/etc/php5/conf.d/curl.inifor a lineextension=curl.soand add it if it is not there.Download and install the newest version of cURL, see also https://curl.haxx.se/download.html.
We also recommend downloading and getting familiar with sample implementation in PHP.
8.5.6. Error Messages in JSON (OIDC)
Error messages contain the error code in form of an ASCII string under the error key.
A human readable error description should be found in a JSON response under the error_description key.
MojeID can return the following error codes:
Error Code |
Possible Causes |
|---|---|
|
Wrong |
|
Missing required parameters, one or more parameters unreadable/unparseable. |
8.6. Appendix 7 – Correct Implementation Procedure
When implementing the MojeID service, follow these best practices:
Logging into the MojeID service should be initiated only by a “Login with MojeID” button, as described in the implem-oid-zadost-prihlaseni section.

There should be text links “Why MojeID” and “Create MojeID account” next to or under the “Login with MojeID” button.
Direct the “Why MojeID” link to a local page explaining the benefits of using MojeID on your page (local benefits) or the information page.
The “Create MojeID account” text link can be replaced by a “Create MojeID account” button as per the example.

Direct the button to a local MojeID registration page or to a universal MojeID registration form.
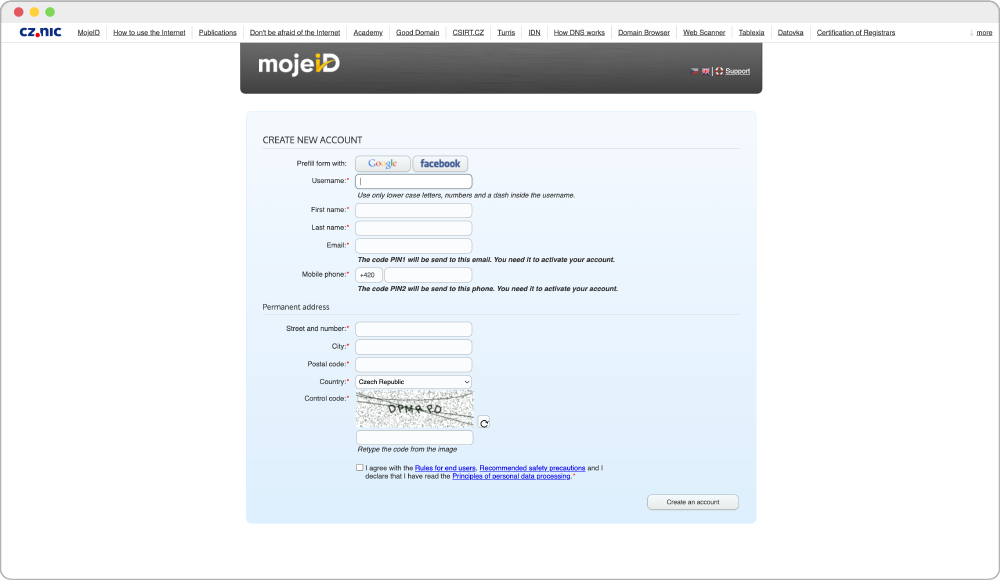
If it is not possible to add links to the button as per the previous points 2.a and 2.b, we recommend to add them to an administration page of the user’s local account.
If possible, place a “Powered by MojeID” logo on your main page with a link to the place in your system where MojeID is used, or to the local page in your system that contains information on the MojeID service.

The data that are required to be handed over have to be in line with your system:
Only the items that are required for the registration process in your system can be marked as required.
The other items have to be marked as optional.
You must not require the disclosure of items that you do not use in your system.
If you require the disclosure of the user’s personal data during the login using MojeID, it is recommended (in case this data differs from the data stored in the local account of your service) to let the user decide whether they want to keep the existing data in the service’s local account, or whether they should be updated by the data retrieved from MojeID.
The implementation of the MojeID service needs to be designed in such way that the MojeID user can choose from the following two options when they first access your service using MojeID:
link MojeID with an existing local account, or
create a new local account using data retrieved from MojeID and link this newly created local account with MojeID.
In the user’s local account administration:
We recommend to display the user’s MojeID identifier upon linking with the MojeID account.
We recommend to show a link or a button “Create MojeID account” as per the point n. 2. In case the user does not have their local account linked with MojeID, and therefore probably does not have a MojeID account, we recommend to prefill the MojeID registration form with the data from the user’s local account.
The user needs to have an option to link MojeID with an existing local account, if it is not already linked.
The user needs to have an option to unlink the local account from MojeID.
Changes of the appearance of buttons and other graphical elements are possible only with an explicit consent from the CZ.NIC Association.
MojeID implementation must be done only using protocols OpenID Connect or SAML as per specification in the technical documentation.
Warning
The OpenID 2.0 protocol is no longer supported.
9. Record of Changes
Version |
Segment |
Change description |
|---|---|---|
3.1.5 |
Appendix 1 – List of Data to be Handed Over (OpenID Connect) |
Added |
3.1.4 |
Changed manual about sending client certificate |
|
Whole documentation |
Removed last mentions of protocol OpenID 2.0 |
|
3.1.3 |
Added plugin for example login to MojeID via PHP client |
|
3.1.2 |
Checking Data Validity |
Removed verification via PIN1 and PIN2 |
3.1.1 |
Identity verification request with a NIA-paired account |
Fixed values of acr_values and AuthnContextClassRef including usage examples |
Updated manual for login with NIA-paired account (CS version only) |
||
3.1 |
Whole documentation |
Removed all parts about OpenID 2.0 protocol from the documentation |
3.0.9 |
Added installation manuals of extensions for popular platforms (CS version only) |
|
3.0.8 |
Appendix 1 – List of Data to be Handed Over (OpenID Connect) |
Added “Organization” as a handed over data |
Changed SSL certificate link to the Let’s Encrypt service |
||
Added note, that automatic (dynamic) registration cannot be used for Full access |
||
3.0.7 |
Whole documentation |
Renamed |
3.0.6 |
Appendix 1 – List of Data to be Handed Over (OpenID Connect) |
Removed the option to verify personal account using PIN3 |
3.0.5 |
Basics of MojeID |
Added information about mojeID pairing with NIA |
3.0.4 |
|
Added OpenID 2.0 protocol deprecation warning on all relevant pages |
3.0.3 |
Appendix 1 – List of Data to be Handed Over (OpenID Connect) |
Add Flag - NIA to the list of data to hand over |
3.0.2 |
Whole documentation |
Fix minor typos and untranslated text |
3.0.1 |
Whole documentation |
Change the term “disclose” to “hand over” in the context of the data to be handed over |
3.0 |
Whole documentation |
Added English version of the documentation |
2.18 |
Appendix 1 – List of Data to be Handed Over (OpenID Connect) |
Added a missing piece of data that is handed over — |
|
Added a security key login method, including corresponding messages |
|
Communication via OpenID Connect |
Added a login method — security key |
|
2.17 |
Added a part about manual registration of a client in mojeID test environment for OIDC |
|
2.16 |
Text of the Transition to a Different Protocol section changed, specific information about transition from OID2 to OIDC added |
|
Added spaces around a slash in the Implementation via OpenID Connect (OIDC) section |
||
Changed two capital letters for more consistency in the Identity Authentication Request |
||
2.15 |
Appendix 1 – List of Data to be Handed Over (OpenID Connect) |
Fixed attribute For full access in the list of data to be handed over |
2.14 |
Appendix 1 – List of Data to be Handed Over (OpenID Connect) |
Described data types of the data to be handed over |
2.13 |
Added legal notice regarding documentation |
|
Record of Changes |
Reworked with the newest changes on top |
|
2.12 |
Fixed invalid JSON examples |
|
Appendix 1 – List of Data to be Handed Over (OpenID Connect) |
Deleted “Opencard number” and “google_plus” data to be handed over in all protocols |
|
2.11 |
Everywhere |
Fixed links to the new mojeID website |
2.10 |
Added implementation via OIDC process overview |
|
Added Overview of libraries and modules for OIDC |
||
|
Added Overview of libraries and modules for OID2 |
|
2.9 |
Favicon’s purpose explanation and instruction for its setup |
|
Instructions for unsubscription |
||
Changed recommendation for SSL tuning |
||
2.8 |
Important note on restricted usage of frameworks |
|
2.7 |
Updated addresses according to the new test server and explicitly listed all OIDC endpoints |
|
Everywhere |
New technical support email address techsupport@mojeid.cz |
|
2.6 |
Everywhere |
Changed the order of protocols – OIDC is now the first one |
|
Changed chapter name |
|
2.5 |
Added the possibility of manual registration via OenID Connect via the new mojeID server interface |
|
2.4 |
Added support of direct registration via OpenID Connect |
|
2.3 |
Added information for testing communication via OIDC and SAML |
|
Added examples of code and communication for implementation via OIDC |
||
Added recommendation for adjusting communication |
||
Added note on error responses in JSON for OIDC, replaced obsolete link |
||
|
Added a piece of data for disclosure – data box (ISDS) |
|
2.2 |
Appendix 4 – List of Data to be Handed Over (SAML specs.nic.cz) |
Added list of other identificators for disclosure of data via SAML |
2.1 |
Moved links to protocol specifications
to |
|
Added link to configuration of OIDC on mojeID server |
||
Added mention of client’s metadata and extra information on manual registration |
||
Added a whole segment |
||
Added a link to a certificate for verifying metadata and to a tool for dcoding SAML messages |
||
Added a whole segment |
||
Added a link to a tool for testing SAML settings |
||
Record of Changes |
Added a whole segment |